NA C7 Z06 build - HPR 468 LT-
The Z06 has always been THE RPO code for the best of Corvette when it comes to road racing. Dating back to 1963, those first Z06's had big brakes, big tanks, 4spd manual transmissions, and the hottest small block with fuel injection Chevy had. Fast forward into the 2000's and we have a light weight 405hp LS6 powered 5th Generation Corvette and ultimately the 427 LS7 that powered the C6 Z06. Something changed with the 7th generation in that GM went a different direction deciding on a supercharged route that would give the power they wanted and a smooth driving experience. What happened was a heavier car that would easily see over heating issues on track with more experienced drivers.
This build will show off what COULD have been....and will be now.
A local customer came to us and asked how we could make more power from his LT4 without having it melt down on track. After weighing options from a number of speed shops on cooling package upgrades and the costs to do so, he decided to strip all of the supercharger and cooling from it and go bigger and NA to increase power while also taking weight from the car.
Early on the choice was made to keep the LT4 together for another project of his, so this was a ground up build from the get go.
The foundation, a new GM GenV LT1/LT4 block (they share the same PN).

Here you can see the block getting ready for the sleeving process. Only the front and rear main caps are in place and used to locate it during this process.

Freshly back from our friend Steve at Race Engine Development, the new LT block is now filled with a larger bore Darton sleeve to allow us to bring the bore out to a finished size of 4.185 and give us more cylinder length for the big stroke.

A few steps not shown before it made it into the hone, LS bearing machine work, rod clearance for the bigger stroke, and final deck surface. As it sits here in the hone, all caps are now back in place and a the torque plate is going on to size the cylinders before it comes out and is finally de-burred by hand before final wash.
Once the block is washed, dried and the cylinders cleaned and wiped down it can now make it's way into the assembly room. Here plug install takes place as well as the first steps to assembly, bearing fitment.

Once the final size of bearings is selected for clearance, caps are removed and the bearings are covered with Motul 10-40 break in oil for lube.


With the Callies Magnum crank balanced, cleaned and wiped down it is ready to drop in and begin assembly work.

The GenV LT's are no different than any other engine, thrust must be checked and set any time the thrust cap goes on. In this case, we are using a LS bearing set so we can have a full thrust face rather than the 1/2 thrust that GM has been using in these engines stock.
Once the thrust is set, the #3 cap can be torqued in place, side bolts installed and final thrust is checked one last time. The rest of the external plugs are installed and we begin the assembly of the piston and rods.

Forged H beam connecting rods with ARP 2000 7/16" bolts with a slender profile give us cam tunnel clearance while remaining robust enough to live on track. Pistons are custom 2618 forgings to our design made by Wiseco. Piston pins feature a tool steel dual taper design for added strength without the added weight of a thick wall pin you might find in a power adder application.


Once the rods are hung on the pistons, they get wrapped with a set of Total Seal Piston Rings with a steel top ring, and Naiper second with a 2.0mm oil ring. All pistons are lubed and dropped in and rod caps torqued. 
Once we have the short block together we check rotational torque values, side clearances on the rods, rod to block clearance and apply final lube between parts. 
At this point we have a "normal" 468 cid GenV LT short block. This will accept any drop in LT camshaft, hyd lifters, and all of the normal functions could be retained as you would in the production car. We have other plans however.
What has been lacking in the GenV world are cylinder heads. The LT1 and LT4 heads have huge ports and they will move a lot of air flow if asked to do so. This can also lead to some sluggish performance however in the low and mid RPM ranges where a lot of these cars live. Enter the CID LT casting. The great thing about these is that they come very small so you can design and tweak everything from valve size to port design and location. Our friend Greg Good has been no stranger to the CID cylinder head and has developed one of, if not the very best set of ports for these heads. Once they were returned to us the work is nothing short of amazing to see in person.


For this set we decided to use the OE LT4 valves given their light weight Ti intake and strong enough for power added exhaust valve which was also light enough to use in this application.
Now that we have our cylinder head selection finished, to fully use the size of the engine and show off the cylinder head while giving us a easy maintenance schedule we decided to go with one of our 0.742" lift hyd. roller profiles from Comp Cams. This also means we could not use a OE rocker arm either, more on that later. 
The Pac1209x has been a proven dual spring setup that we have used with this camshaft and is small enough to fit into the pockets of the LT head as well as give us a low enough bind height for the lift of the camshaft.
Now that we have one head assembled, and know what our target spring install height needs to be we move to install of the cam and degree since we will not be using a OE phaser style gear this is very critical.

Using the LS2 single bolt gear will remove any chance of timing changes, and reduce the weight of the phaser. This will require the use of the Katech front cover since this also means the cam sensor needs to move closer to the gear.
Since we are going outside the range of the OE rocker arm we went with the steel bodied T&D machine LT drop in rocker arms. These have a smaller body to reduce weight as much as possible and give us a roller tip to allow for the larger lift.

With the cam locked down, it is time to install one head with checking springs and solid lifters to measure piston to valve clearance.

One thing we did learn during this process is that the T&D rocker has slightly more ratio (most rockers will) and actually measures out to a 1.86:1 ratio giving us 0.763 lift before deflection in the system when checking with the solid lifter.
Speaking of lifters, our choice lifter on any of the hydraulic lifter LS and LT engines has been the Johnson line of lifters. These have performed flawlessly for us in ever application we have used so far. With this we are using the standard travel link bar style, non-axle oiling.

Fully assembled head is now going on for good with ARP hardware. You can also see our DOD delete valley cover from Katech going on as well since none of that will be retained.

With both heads on, pushrod length measured the rocker arms can go on for good.


Something to note, the T&D rockers will NOT clear the OE valve covers, so a quick order to Katech gave us the clearance we needed in their cast GenV valve covers.

Back top side a new LT4 high pressure fuel pump, OE rails, lines, fitting and LT4 injectors will take care of the fuel supply.


All finished, plumbed and wired ready for the new intake manifold.
While it is true that the C7Z06 did come stock with a dry sump oil system we wanted to improve on this as well to give better oil control as well as provide a crankcase vacuum source. ARE offers a number of systems including this 4 stage package that, at least for the C7 Corvette, even allows the retaining of the A/C system which is nice to have in Texas. 


Now you can see the Katech billet front cover as well as the new ARE pan and scavenge ports to pull the oil out of the engine which will be pumped back to a ARE oil tank as well.

Since the C7Z runs a blower pulley on the front side of the balancer there is room to put the dry sump drive on the front here as well. It is tight but everything tucks in around the steering rack without moving the engine or rack.

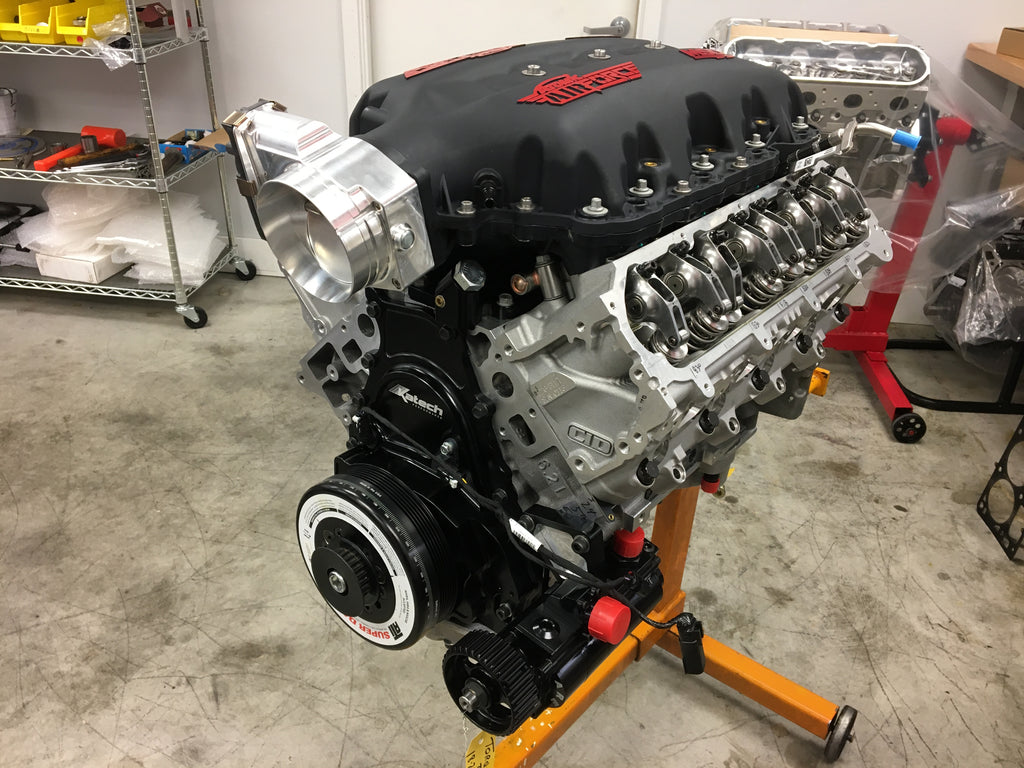
Final top, a MSD intake manifold and NW 103mm drive by wire throttle body to clear the low hood line of the Corvette. While this will limit max power, the ablity to keep the engine under the hood for aero was more important. 
Wrapped and shipping out to the customer for install. Stay tuned for results when the car is finished!